If you just installed Manim and you haven’t started creating animations I recommend first reading this guide on How To Run Manim In VS Code.
It will teach you how to set up Visual Studio Code for the best Manim experience.
But if you already installed it here’s how to get started creating animations:
1. Create a Python file for Manim animations
To start using Manim in vscode you’ll need to create a new Python file.
1. Click Ctrl + N or Command + N on Mac.
2. Select Python as the language.
3. Click Ctrl + S or Command + S to save this file on your computer. Make sure the file has a .py extension.
Every animation that you export with Manim will go into the directory where you saved your Python file.
2. Import Manim into VS Code
Once you created a Python file you’ll need to import the Manim library.
from manim import *Importing Manim is required for every project if you want VS Code to be able to understand that you’re writing Manim code.
3. Create a new scene
1 scene = 1 video file. Each new scene will output a new video file.
class scene_name(Scene):
    def construct(self):
You can create multiple scenes inside of one Manim project.
Notice the indentation. The Manim code that you write under def construct(self): will be assigned to that scene.
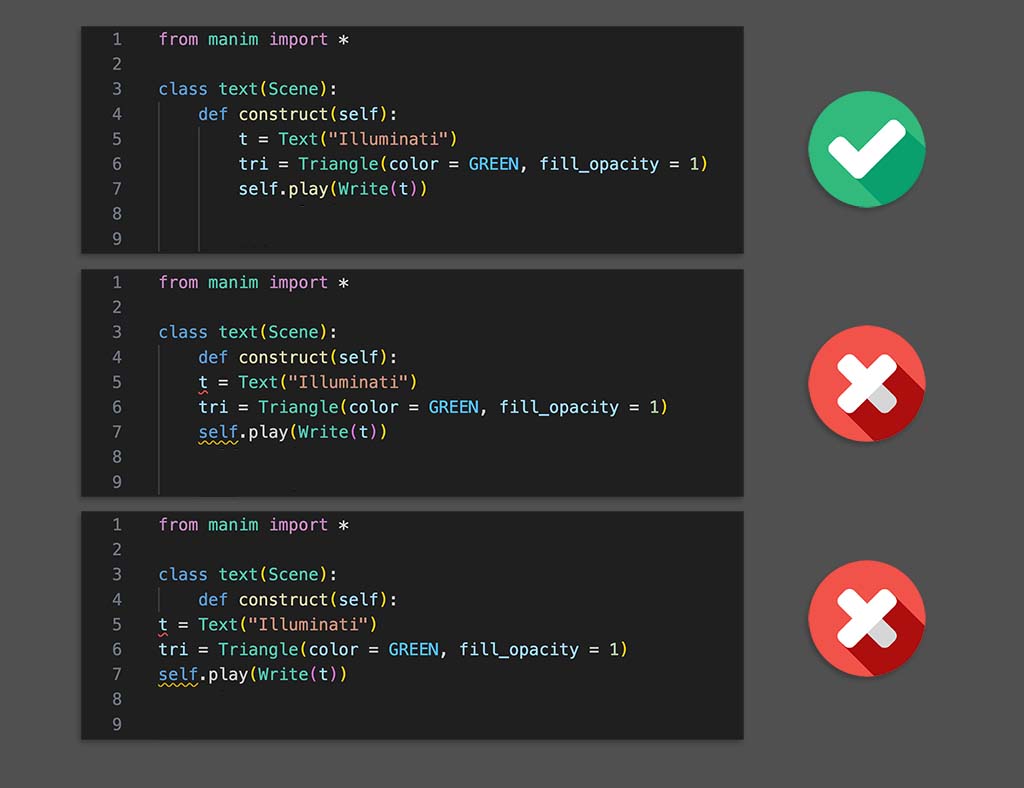
Your Manim code always lives under def construct(self):.
4. Make your first Manim animation
Let’s create 3 different animations to learn the basics of how to use Manim.
First animation:
from manim import *
class illuminati(Scene):
    def construct(self):
        t = Text("Illuminati")
        tri = Triangle(color = GREEN, fill_opacity = 1)
        self.play(Write(t))
        self.wait()
        self.play(Transform(t, tri))
        self.wait(3)
Output:

I’ll explain each line of code so you can understand what happened here.
Line 1: I import Manim into VS Code. This allows it to understand that I’m trying to write Manim code.
Lines 2 and 3: I create a new scene called “Illuminati”. This process is the same for every single scene that you want to create in Manim. 1 scene = 1 video file.
Line 4: I create a new variable called t and assign the text “Illuminati” to that variable. Assigning a variable is useful because if I want to change the text later on I only have to do it once because from here I’ll use the variable I created to call that text in my code.
Line 5: I create another variable called tri and assign a Triangle object to it. I set the triangle to be green and its fill opacity to be 100%.
Line 6: I tell Manim to animate the text on the screen. I use the Write command to define what kind of animation type I want Manim to use. Write works great for text and for shapes. Anytime you want to show something happening on the screen you need to use the self.play() command.
Line 7: I tell the animation to pause for 1 second.
Line 8: I tell Manim to animate the variable t (which is the text “Illuminati”) transforming into the variable tri (which is the green triangle).
Line 9: I tell the animation to pause for 3 seconds.
Second animation:
class positioning(Scene):
    def construct(self):
        sq = Square(color = RED)
        t = Text("Shrek")
        t.next_to(sq, RIGHT)

        self.play(Write(sq), Write(t))
        self.play(Swap(t, sq))

        g = VGroup(t, sq)
        self.play(g.animate.shift(LEFT*5, UP*2))
        self.play(g.animate.move_to(ORIGIN))

        d = Dot(color = RED)
        self.play(Transform(g, d))
        self.wait(3)
Output:

Here’s the explanation of each line of code:
Lines 1 and 2: I create a new scene called “positioning”. This allows me to create another separate animation within the same Manim Python file (I also leave “from manim import *” at the top of my Python file).
Line 3: I create a new variable called sq and assign a red square to it.
Line 4: I create a new variable called t and assign the text “Shrek” to it.
Line 5: I position the text “Shrek” next to the red square on the right side.
Line 7: I tell Manim to animate the red square and the text “Shrek” on the screen both using the Write() animation type.
Line 8: I tell Manim to swap positions of the red square and the text “Shrek”. Since I want to show the swap happening on the screen I put everything inside the self.play() command.
Line 10: I group the text “Shrek” and the red square. This allows me to animate all objects in that group together. I assign that group to a new variable called g.
Line 11: I tell Manim that I want to animate the group moving 5 squares to the left and 2 squares up. By default, the Scene in Manim is made up of a grid of 14 by 8 squares. All objects that you add on the screen are put in the center if not specified otherwise. Here’s what the grid looks like:

Line 12: I tell Manim that I want to animate the group from its current position to the ORIGIN. Origin means the center of the coordinate system (or the screen).
Line 14: I create a new variable called d and assign a red dot to it.
Line 15: I tell Manim to animate the group with the text “Shrek” and the red rectangle transforming into the red dot. Again, since I want to show it happening on the screen I put it inside the self.play() command.
Line 16: I tell the animation to pause for 3 seconds.
Third animation:
class text(Scene):
    def construct(self):
        t1 = Text("Never gonna ")
        t2 = Text("give you up")
        t3 = Text("Never gonna let you down")
        g = VGroup(t1, t2)
        g.arrange(DOWN, aligned_edge = LEFT)

        self.play(Write(t1))
        self.play(Write(t2))
        self.wait()
        self.play(g.animate.arrange())
        self.wait(1)
        self.play(TransformMatchingShapes(g, t3))
        self.wait(3)
Output:

Here’s the explanation of each line of code:
Lines 1 and 2: I create a new Manim scene and call it “text”.
Lines 3 4 and 5: I create three new variables t1, t2, and t3, and assign text to each of them.
Line 6: I group the first two text variables by using VGroup (vector group) and assign this group to a new variable called g.
Line 7: I arrange this group so that all the elements inside of it are placed top to bottom and aligned to the left edge. Remember that at his point I haven’t yet used the self.play() command so everything that I have done up until this point wasn’t visible on the screen.
Lines 9 and 10: I tell Manim to animate the first and the second text on the screen. If objects are in a group together that doesn’t mean you can’t animate them appearing on the screen one by one.
Line 11: I tell the animation to pause for 1 second.
Line 12: I tell Manim that I want to arrange the g variable which has my first two pieces of text. I leave the arrange() parentheses empty because by default it arranges all objects in a group from left to right and puts their center in the center of the frame.
Line 13: I tell the animation to pause for 1 more second.
Line 14: I tell Manim that I want to show the group with my first two pieces of text (t1 and t2) transforming into the third piece of text (t3) using the TransformMatchingShapes() method. This method transforms text in a nice way where the matching letters from the first text move into the position of those letters of the second piece of text.
Line 15: I tell the animation to pause for 3 more seconds.
5. Run Manim code and export your animation
There are two ways to run Manim code and export the animation inside of VS Code.
1. Export with Manim Sideview extension
There is a great extension that you can install into VS Code called Manim Sideview.
It will let you preview your animations inside of VS Code without having to find them in your file system.
To install the extension go to VS Code extensions (the four square icon on the left) -> look for Manim Sideview and click Install.

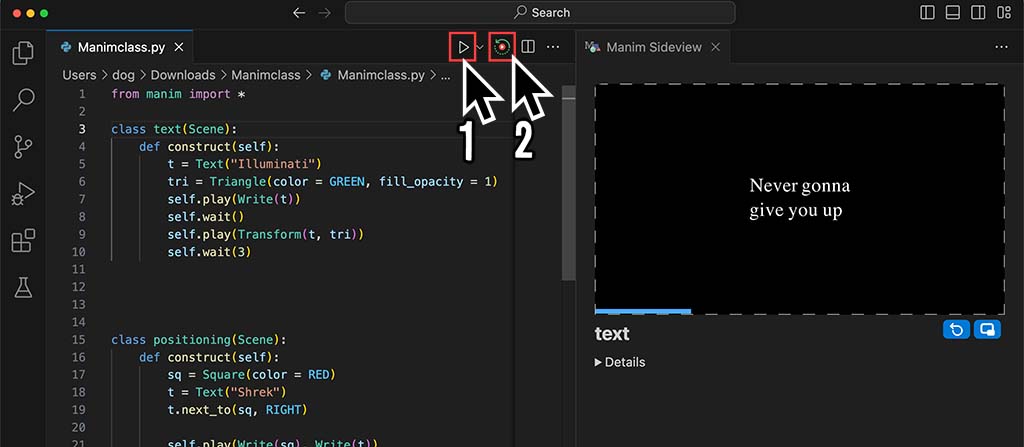
Once you have the extension installed, run your Manim code and then click on the Manim Sideview icon to render and preview it.
You will find the animation file in the folder where you saved the Python file that you used to write code for the animation.
You can click “Details” below the Manim Sideview window to see the location of your output file.
2. Export through the Terminal
The second way to export your Manim animation is through the Terminal.
1. Select Run -> Run Without Debugging. This will open the Terminal window at the bottom of your VS Code. Make sure you’re inside the path where your Python file is saved.

2. Type manim -pqk [filename.py] [scene_name] to export your animation in 4k.
Example:
If the file that I used to create the animation was called “manimclass.py” and my scene was called “text” then I would have typed this to export it in 4k resolution:
manim -pqk Manimclass.py text

I recommend checking out this guide on how to export Manim video in 4k resolution to learn all about Manim’s export settings.
Let me help you learn Manim
If you want to skip the headache of trying to learn Manim from a bunch of scattered information, I put together a comprehensive 3-hour Manim course for complete beginners.
It will give you all the foundational skills you need to start creating stunning animations with code.
Enroll In Manim Course For Beginners