In this tutorial, I will showcase how to install Manim on Windows following this guide from the Manim Community website.
But I’ll go through it more step-by-step and discuss how to troubleshoot some common errors that you might run into (for example with the LaTeX installation).
Also, this guide is essentially this YouTube video that I made so if you prefer to watch instead of read you can do that here:
1. Install Chocolatey
The easiest way to install Manim on Windows is by using a package manager called Chocolately.
A package manager works from PowerShell (that app that looks scary on Windows), and it’s like a big installer with many other installers inside of it.
So you can install apps like Firefox, VLC, WinRAR, Spotify and many others without having to go to their websites and download the installer.
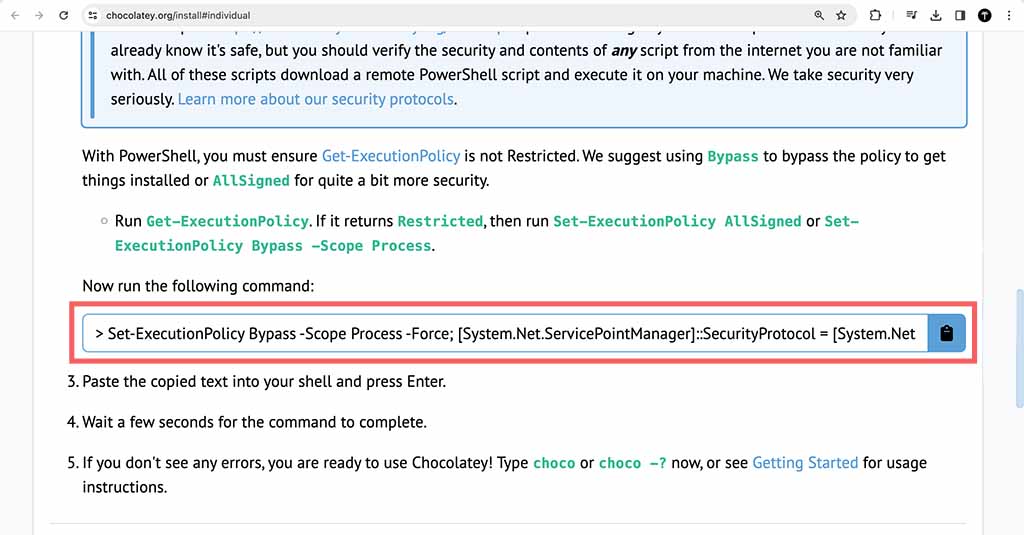
To install Chocolately, go to their website and there you’ll be able to see these installation instructions:
1. First, open PowerShell on Windows as Administrator. To do this, open the search bar, look for PowerShell, then right-click and choose “Run as Administrator”.
2. Next, run this command inside the PowerShell (paste it in and click enter):
Get-ExecutionPolicyThen you’ll have to look at what it says in the PowerShell. If it says Restricted you will also have to run either one of these commands inside the PowerShell for the installation to work:
Set-ExecutionPolicy AllSignedSet-ExecutionPolicy Bypass -Scope Process3. Finally you will have to paste the last command in the PowerShell provided in the Chocolately installation instructions.
The installation could take a couple of minutes.
Also, after some time it will stop. You’ll then have to press the letter Y on your keyboard and click enter, confirming that it can continue.
It can also stop and say:
“Do you want to run the script? ([Y]es/[A]ll – yes to all/[N]o/[P]rint)“
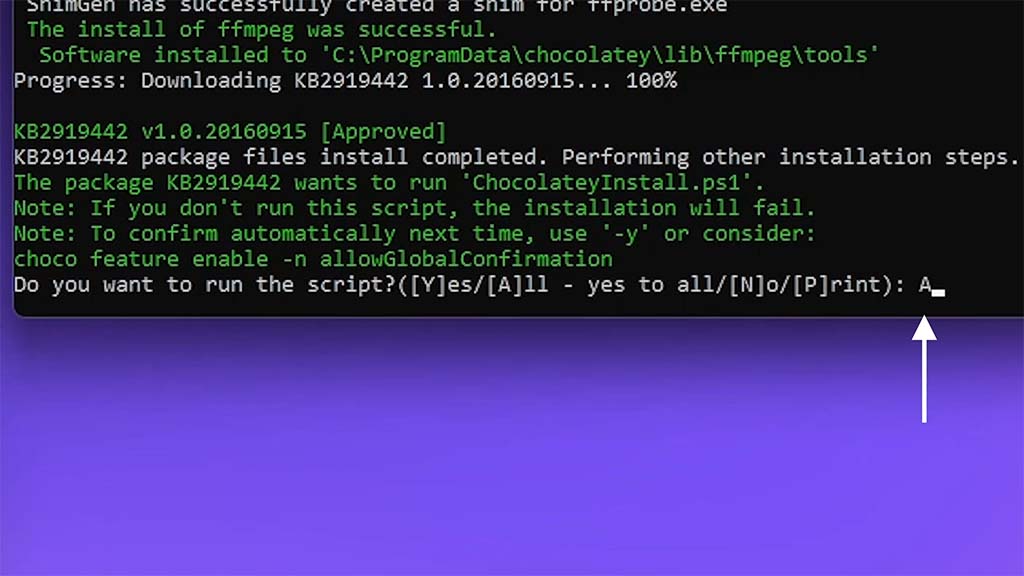
It’s asking you for another confirmation. In this case, press A on your keyboard (which stands for “All”) to install all of the remaining things that it needs to install.
Once Chocolately finishes installing it will say Please reboot at your earliest convenience inside the PowerShell.
Once you see that message reboot your computer and the installation will be complete.
2. install Manim through PowerShell
Once the Chocolately installation is complete all you need to do to install Manim is run this command inside your PowerShell:
choco install manimce3. Install Visual Studio Code
It’s a lot easier to work with Manim when you have a code editor.
My code editor of choice is Visual Studio Code from Microsoft because there is a very cool extension that you can install inside of it to view all the animations you create right next to your Manim code (more about it later).
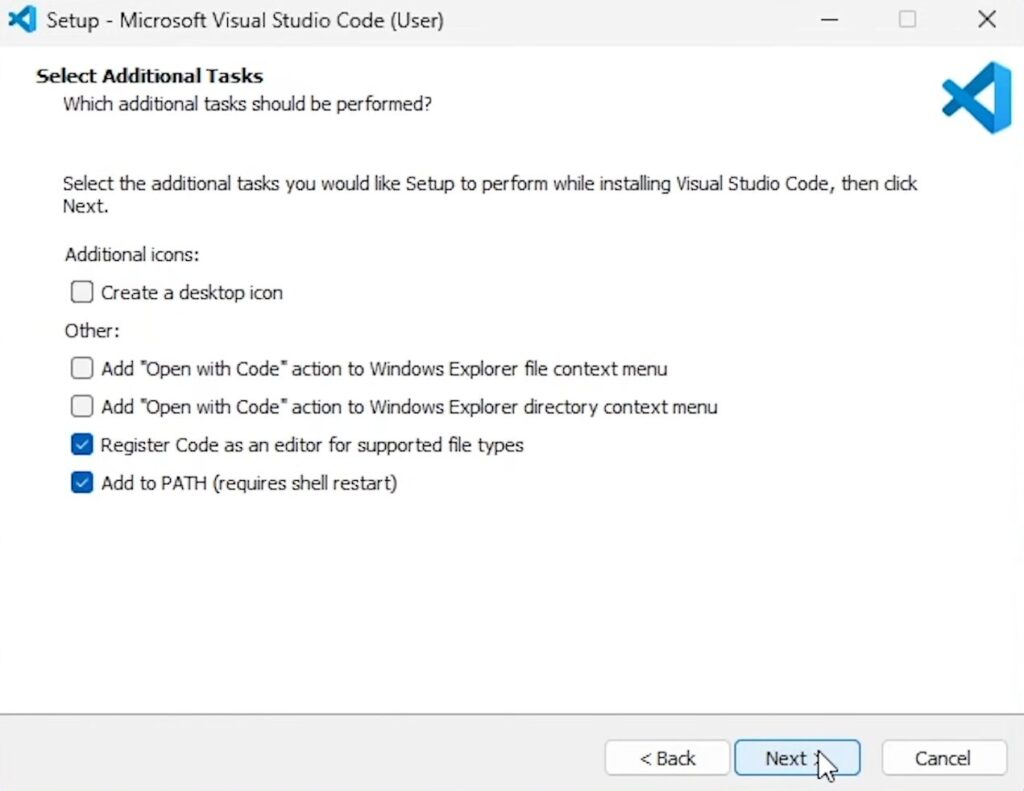
To install VS Code go to their website and click “Download for Windows”. The installer should download to your default download location.
Then, find the installer and open it. It will walk you through the installation process.
Leave everything checkmark on default when installing VS Code.
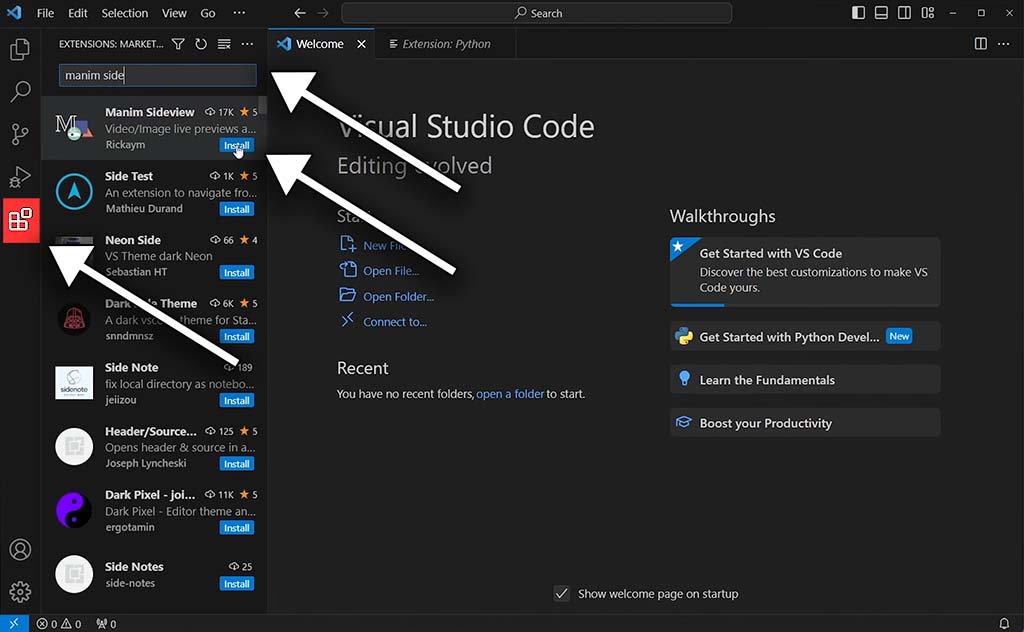
4. Install Visual Studio Code extensions
You can install extensions or add-ons into VS Code just like you can do in your browser. Extensions add extra features and make it easier to write code.
There are three extensions that you’ll need for a smooth Manim experience:
- Python
- Pylance
- Manim Side View
The first two are for Python (which is the programming language that you code Manim animations with) and the third one will let you view the animations you create directly within VS Code rather than having to find the animation files on your computer.
To install extensions into VS Code click on the 4 square icon on the left side and search for the ones you want to install. Once you find them, just click the “Install” button and you’re done.
5. Install optional Manim dependencies
You can install optional dependencies as a bonus that adds extra features. Your code can work without them but you won’t be able to access some features.
There’s only really one optional dependency that’s useful for Manim and it’s called LaTeX.
LaTeX is useful for animating complex math formulas as well as text with Manim.
To install LaTeX through Chocolately open the PowerShell and run this command:
choco install manim-latexWhen I tried installing LaTeX there were a few errors that didn’t let me run Manim code.
I’ll show you how to troubleshoot them.
But first, let’s learn how to start writing Manim code inside of VS Code to understand how to fix any errors.
How do I start writing Manim code and creating animations with VS Code?
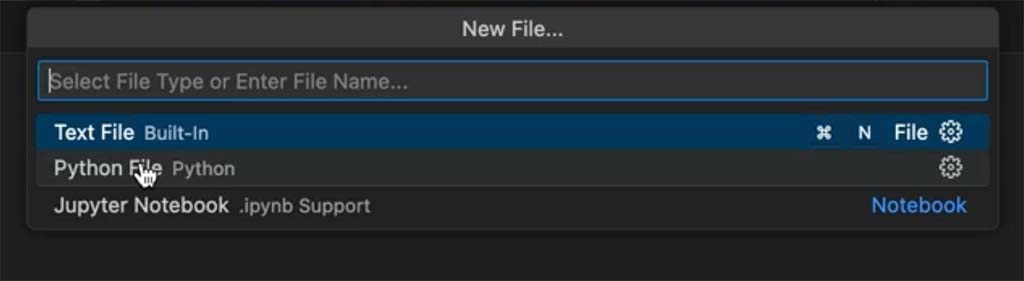
First, to start writing Manim code:
- Open VS Code.
- Press Ctrl + N to create a new file (Or go to “File” and choose “New File”)
- Next, you’ll be able to select which programming language you want to use. Select Python.
- Then, press Ctrl + S to save this file and choose a location that you prefer. Make sure the file’s extension is .py (which means it’s a Python file).
Once you create an animation and run the Python code you will find the animation file inside of the location where you saved Manim’s Python file.
Troubleshooting LaTeX installation for Manim
I tested if the LaTeX installation worked by creating a simple Manim animation that should output the text “Hello” on the screen. Here’s the code to test out the LaTeX installation:
from manim import *
class demo(Scene):
def construct(self):
t = Tex("Hello")
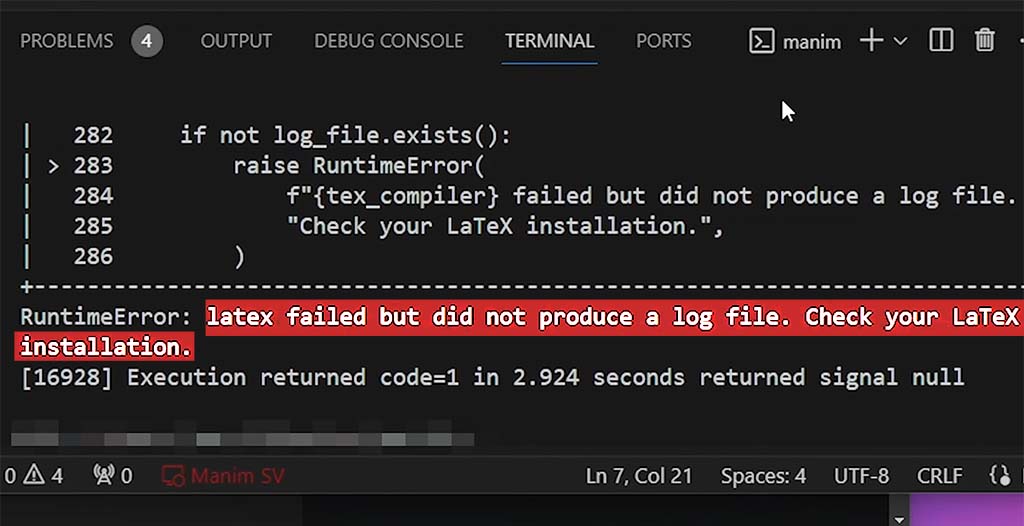
self.play(Write(t))When I tried to run this code to check if LaTeX works it gave me an error saying “RuntimeError: latex failed but did not produce a log file. Check your LaTeX installation“.
So I tried the other command provided in the installation instructions and it worked:
choco install miktex.installBut then, I tested it out with the same Manim code above and it gave me another error saying “ValueError: latex error converting to dvi. See log output above or the 1og file: media\Tex\“
This one was a lot harder to fix.
However, after some Googling, I came across this Reddit post where someone was able to figure out what caused this error and provided a solution.
The solution was to run this inside PowerShell (ikr looks quite scary):
tlmgr install standalone everysel preview doublestroke ms setspace rsfs relsize ragged2e fundus-calligra microtype wasysym physics dvisvgm jknapltx wasy cm-super babel-englishI have no idea what this does but it was able to solve the LaTeX error converting to DVI error for me.
And with all of that done, you should have a good installation of Manim to start creating animations with.
But since you’re installing it, you probably want to learn Manim.
Let me help you learn Manim
If you want to skip the headache of trying to learn Manim from a bunch of scattered information, I put together a comprehensive 3-hour Manim course for complete beginners.
It will give you all the foundational skills you need to start creating stunning animations with code.
Enroll In Manim Course For Beginners