So you decided you want to learn Manim.
But first, you need to install it.
This guide is essentially a more detailed explanation of the installation tutorial from the Manim Community website of how to install Manim on Mac. I’ll just go through it more step-by-step than the official guide.
Also, I already made a YouTube video about how to install Manim on Mac which explains the same thing as this article just in video format:
1. Install Homebrew
The easiest way to install Manim on Mac is through Homebrew.
Homebrew is a package manager that works within your Mac’s Terminal.
It’s essentially like a big installer that has many more installers inside of it.
You can use Homebrew to install and uninstall a bunch of apps through the Terminal without going to a third-party website (or the app store) to download the installer for that app.
To install it go to the Homebrew website copy the first line of code and then paste that into your macOS Terminal.

Once you hit enter it will ask you to input your Mac’s password inside the Terminal (when you write out the password it will not show it, that’s how the Terminal works for some reason).
Once you type in your password hit enter and Homebrew installation will begin.
It will do its thing for a few seconds (or maybe minutes) and you’ll know once it’s finished once you get a message in your Terminal that Homebrew’s installation was successful.
2. Install required Manim dependencies through the terminal
There are a few things that Manim cannot function without. Things like Python and FFmpeg.
You can install these dependencies through Homebrew by first running this command in the Terminal (this one should take a while to install, for me it took more than 5 minutes):
brew install py3cairo ffmpegThen, if you have a Mac with an M series chip or later (like M1, M2 or M3), also run this command in the terminal:
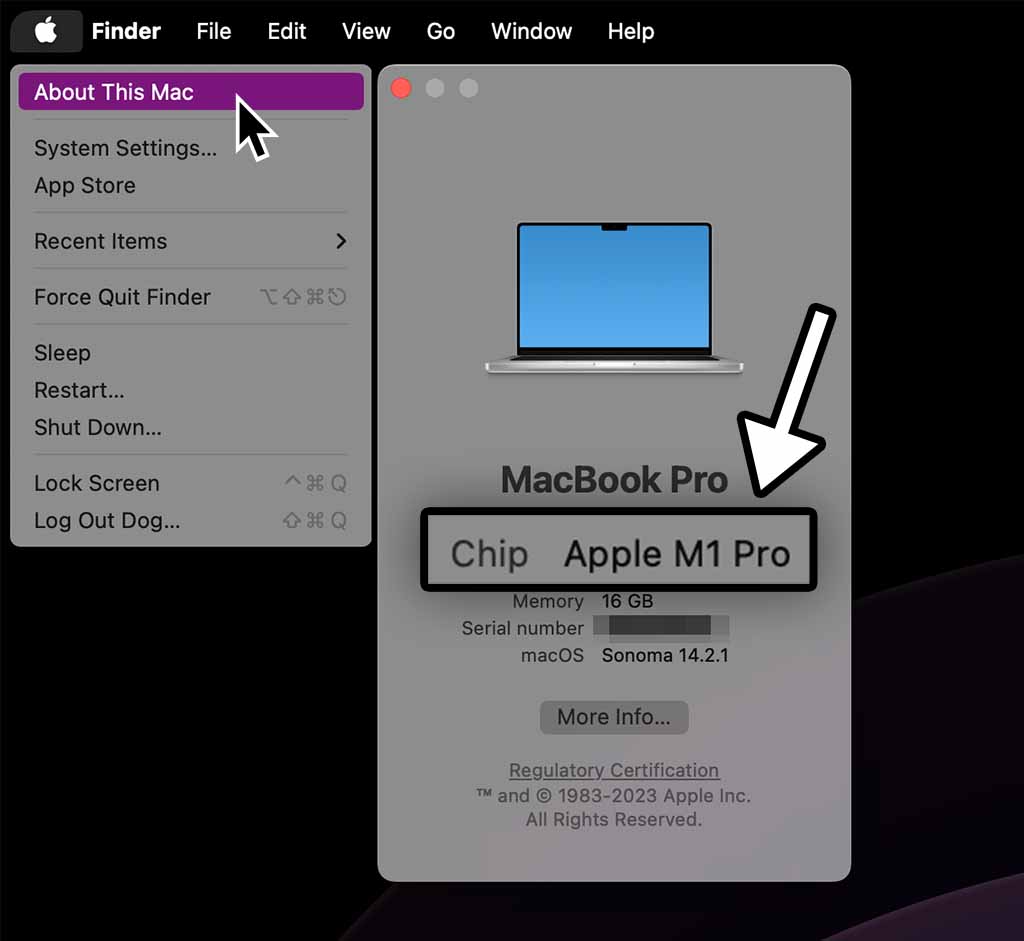
brew install pango pkg-config scipyTo find out if you have an M series chip on your Mac click the Apple menu at the top left of your Menu bar -> select “About This Mac” -> and you’ll see the chip name.
If it says “Intel” then you do not need to run the above command and if it says “M” followed by a number then you need to run the above command for the Manim installation to work properly.
3. Install Manim through the terminal
Finally, run this command in the Terminal to finish the Manim installation:
pip3 install manim4. Install Visual Studio Code
Now that Manim is installed on your Mac the next thing you’ll need is a code editor to write Manim code and create animations.
My code editor of choice is Visual Studio Code from Microsoft. Here’s how to install it on Mac:
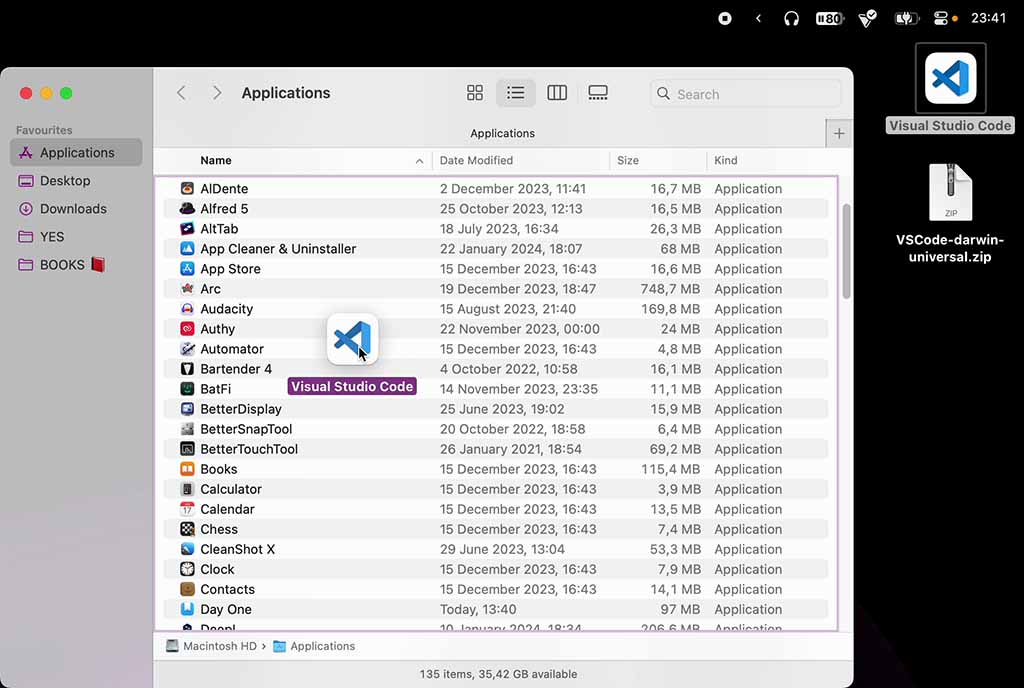
- Go to https://code.visualstudio.com/ and click “Download Mac Universal”. It should download the installer to your default download location.
- Double-click on the .zip file to extract it.
- Go to your desktop -> click “Go” in your Menu bar -> select “Applications” to go to your Applications folder.
- Drag Visual Studio Code into the Applications folder.
This whole procedure is how you install apps on Mac by default.
And now you successfully installed VScode.
5. Set up VS Code for creating animations with Manim
There are a few useful things that you can do within VS Code to make creating animations with Manim a lot easier.
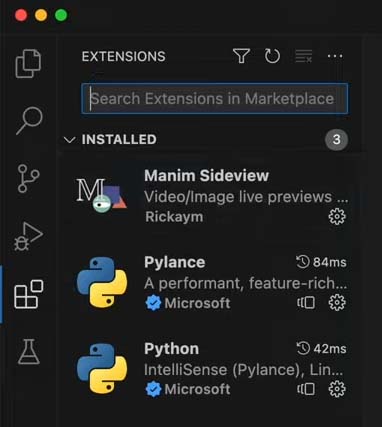
I recommend installing these 3 extensions:
- Python
- Pylance
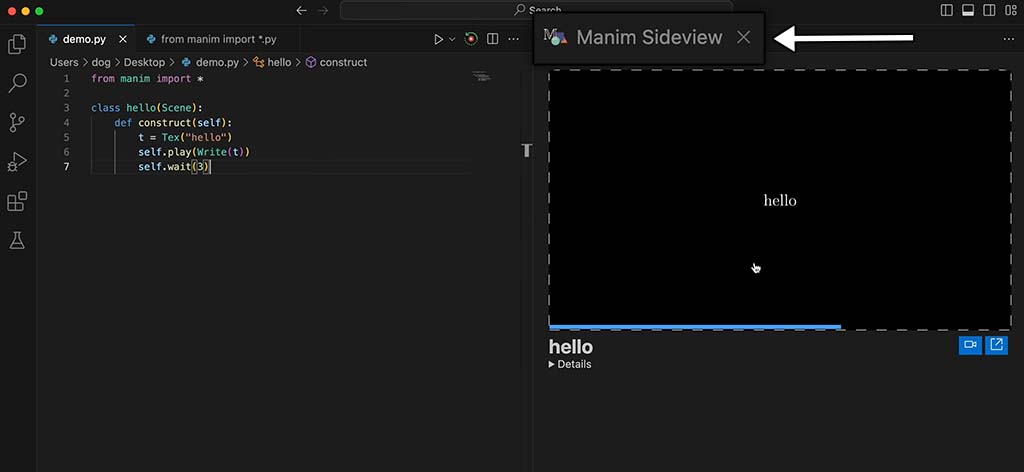
- Manim Sideview
To install extensions into Visual Studio Code click on the four-square icon on the left side and then search for the extension you want. Once you find it you’ll be able to click “Install” to install them.
The Python and Pylance extensions make it easy to work with Python (which is the programming language that you’ll be using to create Manim animations) and the Manim Sideview extension lets you view animations that you create inside of VS Code rather than having to go and find the output file inside of your file system.
6. Install optional dependencies (LaTeX)
There is an optional add-on that you can install to add bonus features to Manim called LaTeX.
It basically lets you create animations for complex math formulas as well as text.
To install LaTeX run this command inside your Terminal (this requires at least 4GB of disk space and will probably take a while):
brew install --cask mactex-no-guiAnd that’s it. Your Manim installation is complete. You can now start using Manim to create animations.
Let me help you learn Manim
If you want to skip the headache of trying to learn Manim from a bunch of scattered information, I put together a comprehensive 3-hour Manim course for complete beginners.
It will give you all the foundational skills you need to start creating stunning animations with code.
Enroll In Manim Course For BeginnersThanks for reading 👋!