The first thing you’ll most likely discover when learning to create Manim animations is that there are many shapes.
So in this guide, I’ll cover these shapes:
- Square
- Circle
- Rectangle and RoundedRectangle
- SurroundingRectangle
- Dot
- RegularPolygon
- Triangle
- Line and DashedLine
Common Manim shape attributes
Before we explore each shape there are a few attributes that are useful to know and that will most likely work with most shapes in Manim:
fill_opacity – sets how visible the fill color of the shape is. 0 = 0%; 1 = 100%.
stroke_opacity – sets the visibility of the shape’s outline. 0 = 0%; 1 = 100%.
color – sets the color of the shape. This will set both the fill_color and the stroke_color at the same time.
fill_color – sets the fill color (interior color) of the shape.
stroke_color – sets the color of the shape’s outline (stroke).
stroke_width – sets how thick the shape’s stroke width (the outline) is.
sheen_factor – adds a color gradient to the shape, with one of the colors being white and the other being the color that you chose for the shape to make the shape look shiny and reflective (the number indicates how much of the gradient to apply. If it’s negative, the gradient will start from black, if positive the gradient will start from white and change to the current color).
Each shape also has its attributes that we’ll explore in the examples below.
Shapes in Manim
Let’s look at the most common shapes and explore different ways of animating them.
Square
You can create a square in Manim with the Square() command.
A square has an additional attribute called side_length with which you can define the length of its side.
Example:
from manim import *

class square(Scene):
    def construct(self):
        s1 = Square(1.1)
        s2 = Square(1.2)
        s3 = Square(1.3)
        s4 = Square(1.4)
        s5 = Square(1.5)
        s6 = Square(1.6)

        g = VGroup(s1, s2, s3, s4, s5, s6)
        g.set_color_by_gradient(RED, ORANGE, YELLOW)

        self.play(Write(g))

        self.play(g.animate.arrange())

        self.play(g.animate.arrange(ORIGIN))

        self.play(Unwrite(g))
Output:

Code explanation:
Line 1: I imported the Manim library into VS Code so that Python understands Manim’s code syntax.
Lines 3 and 4: I created a new Manim scene and named it “square”.
Lines 5-10: I created 6 squares, scaled each of them to be slightly larger than the one before, and assigned each of them to a new variable (from s1 to s6).
Line 12: I grouped all of the shapes using a VGrorup(). This helped me achieve two things: (1) to animate all the squares as one object since they’re grouped, and (2) to color all of them at once since I can color the whole group instead of each of them at once.
Line 13: I colored the group with all the shapes with a gradient of colors going from red to orange to yellow.
Line 15: I used the Write() animation type to animate the group of squares appearing on the screen. When you want to showcase something happening on the screen in Manim you always have to put it inside of the self.play() command.
Line 17: I animated the group arranging itself. If I don’t say anything inside the .arrange() parentheses, it will arrange all objects using the default setting, which is left to right. And since I put everything inside of the self.play() command and also added the .animate attribute, you were able to see the squares arranged on the screen.
Line 19: I animated the group arranging itself to the ORIGIN (which means the center of the screen).
Line 21: I used the Unwrite() animation type to remove the group of squares from the screen.
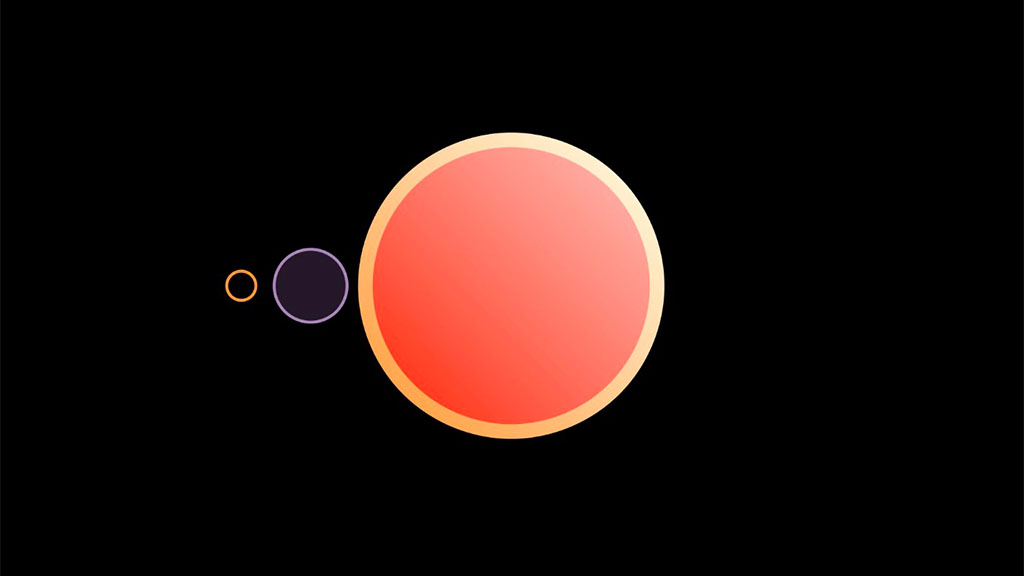
Circle
You can create a circle in Manim using the Circle() command.
You can define the size of the circle using the radius parameter.
Example:
from manim import *

class circle(Scene):
    def construct(self):
        c1 = Circle(
            radius = 2,
            color = PURE_RED,
            fill_opacity = 1,
            sheen_factor = 0.7,
            stroke_width = 20,
            stroke_color = ORANGE
            )

        c1.set_sheen_direction(UR)

        c2 = Circle(0.5, color = PURPLE, fill_opacity = 0.2).next_to(c1, LEFT)

        c3 = Circle(0.2, color = ORANGE).next_to(c2, LEFT)

        self.play(Write(c1), Write(c2), Write(c3))
        self.wait(2)
Output:
Code explanation:
Line 1: I imported the Manim library into VS Code.
Lines 3 and 4: I created a new Manim scene and named it “circle”.
Lines 5-12: I created the first circle and assigned it to a new variable that I decided to name c1. Inside the Circle() parentheses, I defined the radius of the circle to be 2, the color to be red, the fill opacity to be 100% (or 1), which made the color of the circle fully visible, the sheen factor to be 0.7 (which gave the circle the shiny look), the stroke width to be 20, which made the outline thicker, and the stroke color to be orange.
Line 14: I set the sheen (the shine) of the circle to come from the upper right corner (UR).
Line 16: I created another circle, assigned it to a new variable I named c2, and set its radius to be 0.5, the color to be purple, and the fill opacity to be 0.2. I also positioned it next to the first circle and on the left side of it with the .next_to() command.
Line 18: I created the third circle and assigned it to a new variable, c3. This time I set the radius to be 0.2 and the color to be orange. Since I didn’t include the fill_opcaity attribute, the circle will have no fill color. I then positioned this circle next to the second circle and on the left side of it.
Line 20: I animated all of the circles on the screen at the same time using the Write() animation type for each of them.
Line 21: I paused the animation on the screen for 2 seconds.
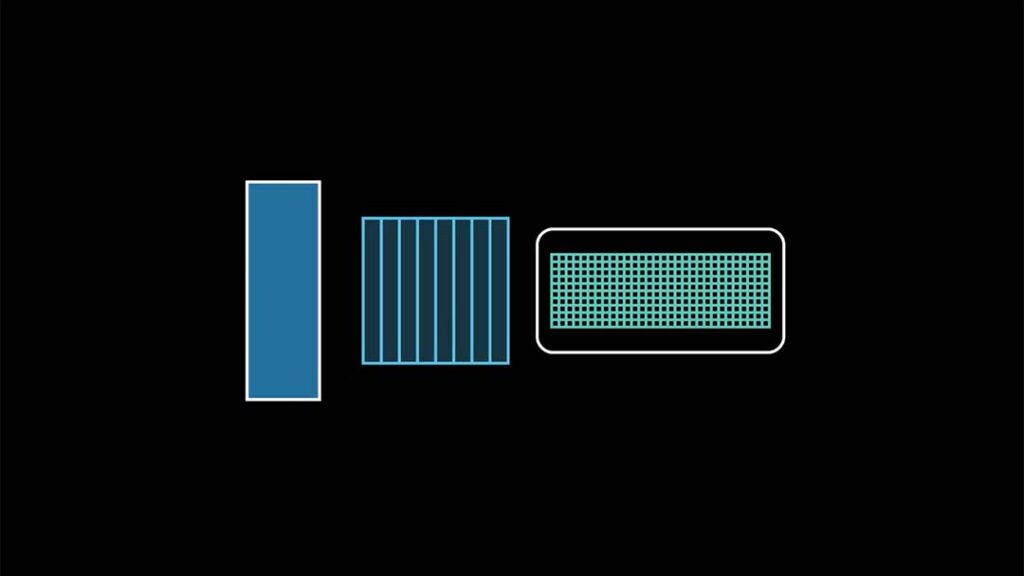
Rectangle and Rounded Rectangle
A Rectangle() and RoundedRectange() are essentially the same shapes with the only difference being that you can round off the corners of the rounded rectangle.
A rectangle has a few additional attributes:
width – defines the horizontal length of the rectangle.
height – defines the vertical length of the rectangle.
grid_xstep – defines the space between vertical grid lines.
grid_ystep – defines the space between horizontal grid lines.
A RoundedRectangle() has an additional attribute called corner_radius which is used to define how much its corners are rounded off.
Example:
from manim import *

class rectangle(Scene):
    def construct(self):
        r1 = Rectangle(
            height = 3,
            width = 1,
            color = DARK_BLUE,
            fill_opacity = 1,
            stroke_color = WHITE
            )

        r2 = Rectangle(
            height = 2,
            width = 2,
            grid_xstep = 0.25,
            color = BLUE,
            fill_opacity = 0.25,
            )

        r3 = Rectangle(
            height = 1,
            width = 3,
            grid_xstep = 0.1,
            grid_ystep = 0.1,
            color = TEAL,
            )

        g = VGroup(r1, r2, r3).arrange(buff = 0.6)

        rr = RoundedRectangle(corner_radius = 0.25).move_to(r3.get_center()).scale(0.85)

        self.play(Write(g), Write(rr))
        self.wait(3)
Output:
Code explanation:
Line 1: I imported the Manim library so that VS Code understands its code syntax.
Lines 3 and 4: I created a new scene and named it “rectangle”.
Lines 5-11: I created the first rectangle and assigned it to a new variable named r1. I set its height to 3, the width to 1, the color to dark blue, the fill opacity to 1, and the stroke color to white.
Lines 13-19: I created the second rectangle and assigned it to a new variable named r2. I set its height to 2, the width to 2, the grid_xstep to 0.25, which set the space between vertical grid lines, the color to blue, and the fill opacity to 25% (or 0.25).
Lines 21-27: I created the third rectangle and assigned it to a new variable I named r3. I set its height to 1, the width to 3, the space between vertical and horizontal grid lines to 0.1, and the color to teal.
Line 29: I grouped all three rectangles and arranged them using the default arrangement settings (which means left to right and centered) with the buff value of 0.6. The buff value sets the space between all the objects.
Line 31: I created a rounded rectangle and assigned it to a new variable I named rr. I set the corner radius (which means how rounded the corners are) to 0.25 and moved it to the center of the third rectangle using the .move_to() command. I then scaled it down to 0.85% of its original size with the .scale() command.
Line 33: I animated the group with three rectangles and the rounded rectangle on the screen using the Write() animation type for both of them.
Line 34: I paused the animation for 3 seconds.
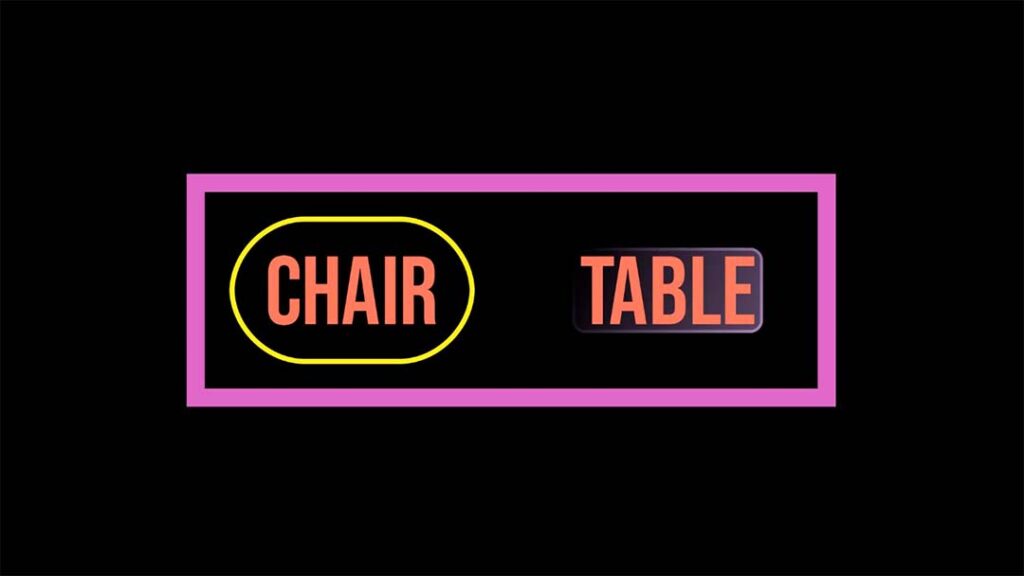
SurroundingRectangle
The SurroundingRectangle() can be used to surround any object or object group with a rectangle or a rounded rectangle.
It has a few additional attributes:
buff – defines the size of the gap between the surrounding rectangle and the mobject that it surrounds.
corner_radius – defines how rounded its corners are.
Example:
from manim import *

class Surrounding_rectangle(Scene):
    def construct(self):
        t1 = Text("Chair", color = RED, font = "Bebas Neue", font_size = 96)
        t2 = Text("Table", color = RED, font = "Bebas Neue", font_size = 96)
        g = VGroup(t1, t2).arrange(buff = 2)

        s1 = SurroundingRectangle(t1, corner_radius = 1, buff = 0.5, stroke_width = 7)
        s2 = SurroundingRectangle(t2, corner_radius = 0.15, color = PURPLE, fill_opacity = 0.5, sheen_factor = -0.7)
        s3 = SurroundingRectangle(g, color = PINK, buff = 1, stroke_width = 25)

        self.add(s1, s2, s3, t1, t2)

        self.wait(3)
Output:
Code explanation:
Line 1: I imported Manim into Visual Studio Code.
Lines 3 and 4: I created a new Manim scene and called it “Surrounding_rectangle”.
Line 5: I created a new piece of text that says “Chair” with the Text() command and assigned it to a new variable named t1. I colored it red, chose a different font, and set the font size to 96.
Line 6: I created the second piece of text that says “Table” and assigned it to a new variable named t2. I colored it red, chose a different font, and set the font size to 96.
Line 7: I grouped both pieces of text with the VGroup() command, which made it easy to arrange them left to right with the .arrange() command. I also added a buff value of 2 inside the parentheses to increase the space between the texts.
Line 9: I created the first surrounding rectangle and said that it should surround t1 (the “Chair” text). I also set the corner radius to 1 (which rounded the corners to 100%), the buff value to 0.5 (which increased the space between the rounded rectangle and the text), and the stroke width to 7 (which increased the outline thickness).
Line 10: I created the second surrounding rectangle and said that it should surround t2 (the “Table” text). I set its corner radius to 0.15 (which rounded the corners a bit), the color to purple, the fill opacity to 0.5 (which made the purple 50% visible inside the rectangle), and the sheen factor to -0.7. The negative sheen factor added a black “shine” to the rectangle, which made it less visible on one side.
Line 11: I created the third surrounding rectangle and said that it should surround the group of both pieces of text. I set the color to pink, the buff value to 1 (so that there’s more space between the objects in the group and the edges of the rounded rectangle), and the stroke width to 25 (so that the line becomes thicc).
Line 13: I added all objects on the screen with the self.add() command. I first added all of the surrounding rectangles since I wanted them to be at the bottom, and then both pieces of text. That’s why the purple rectangle doesn’t cover up the text “Table” with its fill color.
Line 15: I paused the animation on the screen for 3 seconds.
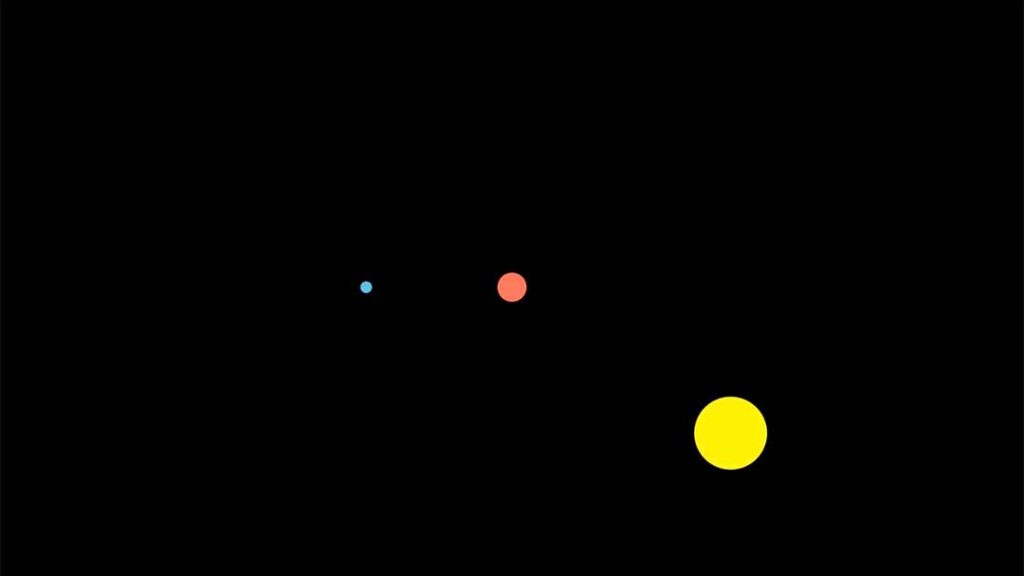
Dot
You can create a dot in Manim using the Dot() command.
You can define the size of the dot using the radius parameter and position the dot on the screen using the point parameter.
Example:
from manim import *

class dots(Scene):
    def construct(self):
        d1 = Dot(color = RED, radius = 0.2)
        d2 = Dot(color = BLUE, point = LEFT*2)
        d3 = Dot(color = YELLOW, radius = 0.5, point = ([3,-2,0]))

        self.add(d1, d2, d3)
        self.wait(2)
Output:
Code explanation:
Line 1: I imported the Manim library into VS Code.
Lines 3 and 4: I created a new scene and named it “dots”.
Line 5: I created the first dot, colored it red, set its radius to 0.2, and assigned it to a new variable that I named d1.
Line 6: I created the second dot, colored it blue, moved it left by 2 squares using the point command in the Manim coordinate system, and assigned it to a new variable I named d2.
Line 7: I created the third dot, colored it yellow, set its radius to 0.5, and moved it to coordinates x = 3; y = -2; z = 0. I also assigned it to a new variable named d3.
Line 9: I added all three dots on the screen by using the self.add() command.
Line 10: I paused the animation on the screen for 2 seconds.
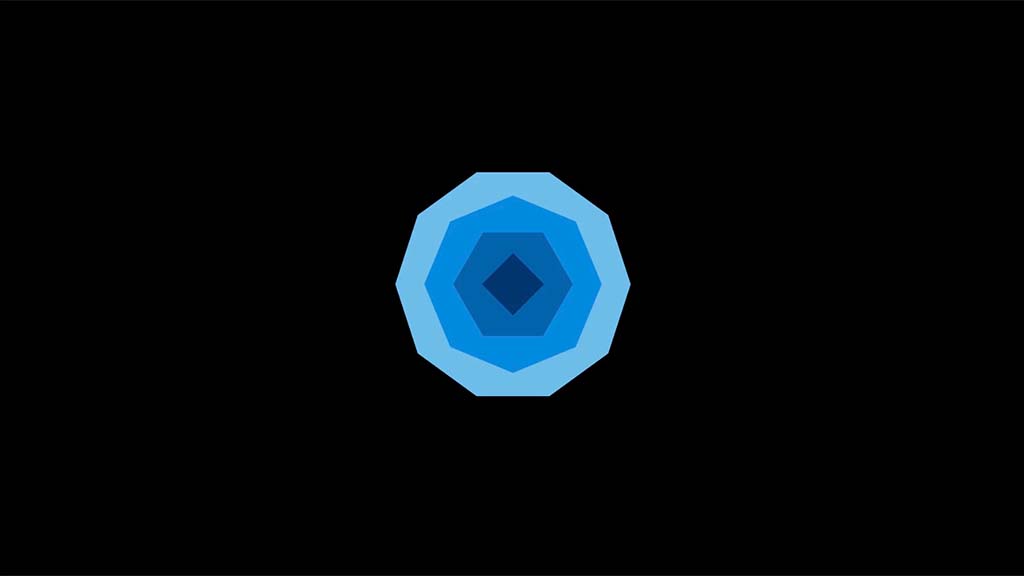
Regular Polygon
You can create a polygon in Manim with the RegularPolygon() command.
A RegularPolygon() has one additional attribute called n which defines how many sides the polygon will have.
Example:
from manim import *

class regular_polygon(Scene):
    def construct(self):
        r1 = RegularPolygon(4, fill_opacity = 1).scale(0.4)
        r2 = RegularPolygon(6, fill_opacity = 1).scale(0.8)
        r3 = RegularPolygon(8, fill_opacity = 1).scale(1.2)
        r4 = RegularPolygon(10, fill_opacity = 1).scale(1.6)

        g = VGroup(r1, r2, r3, r4).set_color_by_gradient('#003060','#055C9D','#0E86D4','#68BBE3')


        self.add(r4, r3, r2, r1)
        self.wait(2)
Output:
Code explanation:
Line 1: I imported the Manim library into VS Code.
Lines 3 and 4: I created a new scene and named it “regular_polygon”.
Lines 5-8: I created 4 regular polygons and assigned each of them to a new variable (r1, r2, r3, and r4). I set each polygon to have a different number of edges (the first number inside the parentheses) and all of them to have a fill opacity of 1. I then scaled each one to a different size using the .scale() command.
Line 10: I grouped all the regular polygons by using a VGroup(). I then used the .set_color_by_gradient() command to color the group in a gradient of colors. I Googled for a blue color palette and copied the HEX codes of those colors. This is how you can set an object to have a custom color in Manim.
Line 13: I added all polygons to the screen using the self.add() command and I made sure to add them in order from the biggest one to the smallest one. If I had done it the other way around, the biggest polygon (r4) would have covered every other one.
Line 14: I paused the animation on the screen for 2 seconds.
Triangle
You can create a triangle in Manim by using the Triangle() command.
Example:
from manim import *

class triangles(Scene):
    def construct(self):
        t1 = Triangle(color = GREEN, fill_opacity = 1)
        e1 = Ellipse(width = 1.55, height = 0.5, color = BLACK).scale(0.7)
        e2 = Ellipse(width = 0.75, height = 0.5, color = BLACK, fill_opacity = 1).scale(0.7)
        t2 = Triangle(color = GREEN, stroke_width = 15).scale(2.2)

        self.play(Write(t1), Write(e1), Write(e2), Write(t2))
        self.wait()
        self.play(Rotate(t2, PI))
        self.play(t2.animate.shift(DOWN*0.8))
        self.wait(2)
Output:

Code explanation:
Line 1: I imported the Manim library into VS Code.
Lines 3 and 4: I created a new scene and named it “triangles”.
Line 5: I created the first triangle, colored it green, set the fill opacity to 100%, and assigned it to a new variable named t1.
Line 6: I created an ellipse (e1) with a width of 1.55 and a height of 0.5. I then set its color to black and scaled it to 70% of its original size with the .scale() command. This eclipse will act as an eye for the triangle. I didn’t have to reposition it elsewhere because the triangle and the ellipse were both in the center by default. I just had to make it the right size to fit into the triangle.
Line 7: I created the second ellipse (e2) with a width of 0.75 and a height of 0.5. I also colored it black but this time with the fill opacity set to 100% so that the whole eclipse becomes black. This one will act as a retina for the eye. I also scaled it down to 0.7 times to match the size of the first ellipse.
Line 8: I created the second triangle (t2), set its color to green, the stroke width to 15 to make the outline thicker, and scaled it up by 2.2 times.
Line 10: I used the sefl.play() command and the Write() animation type to animate each object on the screen.
Line 11: I paused the animation for 1 second with the self.wait() command.
Line 12: I animated the second triangle rotating by PI radians (which is 180 degrees). In Python, you have to define the rotation in radians and not degrees. You can use a degree-to-radian calculator to convert degrees into radians. Because I put the Rotate() command inside the self.play() command, I was able to see the rotation happening on the screen.
Line 13: I animated the second triangle moving down on the screen by 0.8 squares in the Manim coordinate system. By attaching the .animate command to a mobject inside of the self.play() command, you can animate its position on the screen with the .shift(), .next_to(), move_to(), to_edge(), and other commands.
Line 14: I paused the animation on the screen for 2 seconds.
Line and dashed line
You can create a line in Manim with the Line() command and a dashed line with a DashedLine() command.
A line has a few additional attributes:
start – defines the start of the line.
Example 1: start = ([-1, 2, 0]).
These define coordinates in the Manim coordinate system, ([x, y, z]). Z is always 0 if you’re working with 2D animations.
Example 2: start = m.get_right().
In the second example, m is a mobject.
end – defines the end of the line.
buff – defines the space between the ends of the line and the object.
path_arc – defines how bent the line is. A positive value bends the line downwards and a negative value upwards. Example: path_arc = -0.5.
You can also attach arrow tips to the arrow with the .add_tip() command. Learn more about arrows in Manim here.
A dashed line has 2 additional attributes:
dash_length – defines the length of each dash of the line.
dashed_ratio – defines the ratio between the length of the dash and the space. Range of 0-1.
Example:
from manim import *

class lines(Scene):
    def construct(self):
        d1 = Dot(color = RED, sheen_factor = -0.5, radius = 0.25).move_to([-5, 3, 0])
        d2 = Dot(color = RED, sheen_factor = -0.5, radius = 0.25).move_to([5, 3, 0])
        d3 = Dot(color = RED, sheen_factor = -0.5, radius = 0.25).move_to([-5, -3, 0])
        d4 = Dot(color = RED, sheen_factor = -0.5, radius = 0.25 ).move_to([5, -3, 0])

        l1 = Line(path_arc = 0.5, start = d1.get_right(), end = d2.get_left())
        l2 = DashedLine(dashed_ratio = 0.5, start = ([5, -3, 0]), end = ([-5, -3, 0]))
        l3 = DashedLine(start = d1.get_bottom(), end = d3.get_top(), dash_length = 0.5, color = BLUE, stroke_width = 50, buff = 0.5)
        l4 = DashedLine(start = d2.get_center(), end = d4.get_center(), path_arc = PI/1.5, dashed_ratio = 0.8, dash_length = 0.3)

        self.add(l1, l2, l3, l4, d1, d2, d3, d4)
        self.wait(3)
Output:
Code explanation:
Line 1: I imported the Manim library into VS Code.
Lines 3 and 4: I created a new scene and named it “lines”.
Lines 5-8: I created 4 dots (d1, d2, d3, and d4), set their color to red, the sheen factor to -0.5 (this made them black on one side to add some depth), and the radius to 0.5. I moved each of the dots to the edges of the screen using the .move_to() command. Inside its parentheses, I defined the x, y, and z values in the Manim coordinate system.
Line 10: I created the first line (l1) with a path arc of 0.5, which made it bend downwards. I also said that this line should start at the right side of d1 (the first dot) and end at the left side of d2 (the second dot).
Line 11: I created the second line (l2), which was a dashed line, and set its dashed ratio to 0.5 (the ratio of dash space to empty space). I positioned the start of this dashed line at x = 5; y = -3; z = 0. I positioned the end of this arrow at x = -5; y = -3; z = 0. These are the coordinates where the fourth and third circles are located. I could have said d3.get_center() to position the start of the line there, but I just wanted to show you a different way of doing it with coordinates.
Line 12: I created the third line (l3), which was also a dashed line. I set it to start at the bottom of the first dot (d1) and end at the top of the third dot (d3). I set the dash length to 0.5, which set the length of each dash to 0.5, the color to blue, the stroke width to 50, which made the dashes quite large compared to how they normally look, and the buff value to 0.5, so that there’s a bit of space between the dots and when the dashes start.
Line 13: I created the fourth line (l4), which was also a dashed line. I set it to start at the center of the second dot (d2) and end at the center of the fourth dot (d4). I also set its path arc to PI/1.5, the dashed ratio to 0.8, and the dash length to 0.3.
Line 15: I added every object that I created on the screen using the self.add() command. I made sure to first add the lines and then the dots so that the dots covered the lines if they overlapped.
Line 16: I paused the animation on the screen for 3 seconds.
Let me help you learn Manim
If you want to skip the headache of trying to learn Manim from a bunch of scattered information, I put together a comprehensive 3-hour Manim course for complete beginners.
It will give you all the foundational skills you need to start creating stunning animations with code.
Enroll In Manim Course For Beginners