You can create 3D animations with code using a Python library called Manim. If you don’t yet have Manim installed, I recommend checking out these resources first:
- How to install Manim on Windows
- How to install Manim on Mac
- Manim Tutorial For Beginners – Create A Simple Animation
In this guide, I will assume that you’re pretty comfortable with creating 2D Manim animations to avoid overexplaining many concepts.
How to create a 3D animation in Manim
To create a 3D scene in Manim use the Class(ThreeDScene) instead of a regular Class(Scene). A 3D scene will allow you to move your camera in three dimensions and create 3D animations.
I think it’s best to start with an example (it’s quite long but once I explain each line of code it will start looking rather simple):
from manim import *

class threed(ThreeDScene):
    def construct(self):
        #by default phi = 0, theta = -90
        self.set_camera_orientation(phi=75*DEGREES, theta=-45*DEGREES)

        axes = ThreeDAxes()
        cube = Cube(side_length=3, fill_opacity = 0.25, stroke_color = WHITE, stroke_width = 1)
        self.play(Write(cube))

        self.move_camera(phi = 0, theta = -90*DEGREES)
        self.wait()

        self.begin_ambient_camera_rotation(rate = -70*DEGREES, about = "theta")
        self.begin_ambient_camera_rotation(rate = 40*DEGREES, about = "phi")
        self.play(FadeToColor(cube, RED), run_time = 2)
        self.stop_ambient_camera_rotation(about = "theta")
        self.stop_ambient_camera_rotation(about = "phi")

        self.wait()
        self.play(Write(axes))
        self.move_camera(zoom = 0.8, theta = 30*DEGREES)
        self.wait()

        self.play(Rotate(cube, 360*DEGREES))
        self.wait()

        self.play(cube.animate.shift(RIGHT), cube.animate.scale(0.25))
        self.play(cube.animate.move_to(axes.c2p(4, 0, 0)))
        self.wait()

        self.move_camera(phi=75*DEGREES, theta=-45*DEGREES)
        self.wait()
Output:

Code explanation:
Line 1: I imported the Manim library into VS Code so that Python understands Manim’s code syntax.
Lines 3 and 4: I created a new Manim scene named “threed”.
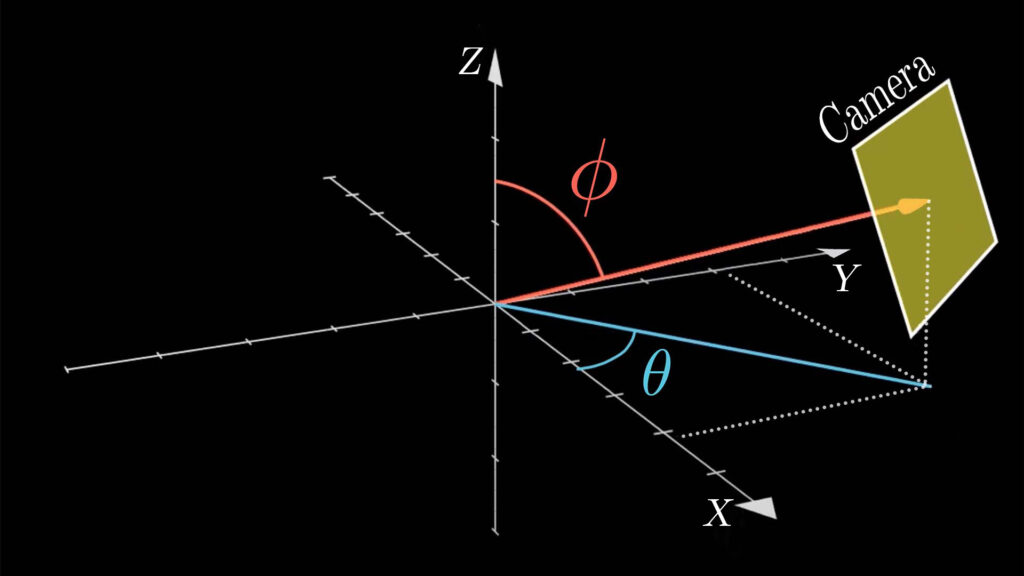
Line 6: I used the self.set_camera_orientation() command to set the initial position of the camera.
By default phi = 0.
Increasing ↑ it rotates camera down ↓.
Decreasing it ↓ rotates camera up ↑.
By default theta = -90 degrees.
Increasing it ↑ rotates camera right →.
Decreasing it ↓ rotates camera left ←.
Line 8: I created a ThreeDAxes() using the default settings since I left the parentheses empty.
Line 9: I created a cube with a side length of 3, fill_opacity of 0.25, set the stroke color to white, and stroke width to 1.
Line 10: I animated the cube on the screen using the Write() animation type.
Line 12: I used the self.move_camera() command to rotate the camera to a different place. This time I said that it should move to phi = 0 (default position), and theta = -90*DEGREES (default position). I had to multiply the degrees by the word “DEGREES” because by default Python uses radians (PI radians = 180 degrees). So I could have also said -PI/2 instead of -90*DEGREES.
Line 13: I paused the animation for 1 second using the self.wait() command.
Lines 15 and 16: I used the self.begin_ambient_camera_rotation() to start rotating the camera about the theta and phi, which meant that the camera would swing from side to side and from top to bottom. I said that the amount it should spin from side to side (about theta) should be -70 degrees, and the amount that it should spin top to bottom (about phi) should be 40 degrees. The camera will continue this movement until it is stopped.
Line 17: I used the FadeToColor() animation type to transform the color of the cube from its original color to red over two seconds.
Line 18 and 19: I stopped the camera rotation around theta and phi using the self.stop_ambient_camera_rotation() commands for each. So in total, the camera rotated while the cube changed color (whatever you surround with self.begin_ambient_camera_rotation() and self.stop_ambient_camera_rotation() will happen while the camera is rotating.
Line 21: I paused the animation for 1 second.
Line 22: I animated the 3D axes on the screen using the Write() animation type.
Line 23: I used the self.move_camera() command along with the zoom parameter to zoom out to 80% (or 0.8). I also said that the camera should move to theta = 30*DEGREES, which made it spin to the right since before that the camera’s theta position was -160 degrees (-90 + -70).
Line 24: I paused the animation for 1 second.
Line 26: I used the Rotate () animation type inside of the self.play() command to rotate the cube by 360 degrees. This time the cube rotated, not the camera around it.
Line 27: I paused the animation for 1 second.
Line 29: I animated the cube moving to the right side by one square inside the Manim coordinate system using the .animate.shift() commands. I wanted the cube to shrink at the same time that it was moving, so I added a comma and used the .animate.scale() command to scale it to 25% of its original size.
Line 30: I moved the cube to coordinates x = 4; y = 0; and z = 0; on the axes. You can learn more about Axes in Manim here.
Line 31: I paused the animation for 1 second.
Line 33: I moved the camera back to its starting position (phi = 75 degrees and theta = -45 degrees).
Line 34: I paused the animation for 1 more second.
How to plot functions onto 3D axes in Manim
You can plot functions onto 3D axes in Manim by using the .plot() command. It works the same way as plotting functions onto 2D axes.
Example:
from manim import *
import numpy as np

class function(ThreeDScene):
    def construct(self):
        self.set_camera_orientation(zoom = 0.6)

        axes = ThreeDAxes()
        cos_graph = axes.plot(lambda x: np.cos(x), color = RED)
        curve = ParametricFunction(lambda x: np.array([np.sin(x), np.cos(x), x/2]), color = BLUE, t_range = (-TAU, TAU))

        t = Text("Example").to_edge(UL)
        self.add_fixed_in_frame_mobjects(t)

        self.play(Write(axes), Write(t))
        self.play(Write(cos_graph))
        self.move_camera(phi=60*DEGREES, theta=-45*DEGREES)
        self.play(Write(curve))
        self.move_camera(phi=30*DEGREES, theta=-45*DEGREES)
        self.wait(2)

        g = VGroup(curve, cos_graph, t, axes)
        self.play(Unwrite(g), run_time = 1.5)
        self.wait()
Output:

Code explanation:
Line 1: I imported the Manim library into VS Code so that Python understands Manim’s code syntax.
Line 2: I imported the numpy library into Python since I’m going to be using the np.cos() command and np.array() command to create the graphs later.
Lines 4 and 5: I created a new Manim scene named “function”.
Line 6: I used the .set_camera_orientation() command to set the initial orientation of the 3D camera. I wanted the orientation to stay the same but zoom out a little, so inside the parentheses, I said that the zoom amount should be 60%, or 0.6.
Line 8: I created a 3D axes with the ThreeDAxes() command. Since I left the parentheses empty, it created the axes with default parameters.
Line 9: I created a cosine function and plotted it onto the 3D axes using the .plot() command. Learn more about how to plot functions onto axes in Manim here. I also set the color of the graph to red.
Line 10: I created a ParametricFunction() and set the x, y, and z values to sin(x), cos(x), and x/2 respectively. I also said that the graph should be blue and defined the t_range(), which is the max length of the function to be in the range of (-TAU, TAU). TAU in Manim basically means infinity.
Line 12: I created a new piece of text that said “Example” and moved it to the upper left edge of the screen using the .to_edge() command.
Line 13: I used the self.add_fixed_in_frame_mobjects() command to add the text on the screen into a fixed position that doesn’t move when the camera shifts around. That’s why the text always stayed at the top left of the animation and didn’t rotate when the camera started moving.
Line 15: I used the Write() animation type to animate the axes and text on the screen at the same time.
Line 16: I used the Write() animation type to animate the cosine function on the screen.
Line 17: I used the self.move_camera() command to animate the camera moving to a different position. By default, phi = 0 (tilts camera up or down), and theta = -90 degrees (tilts camera left or right). So by saying phi = 60, it meant that the angle increased and thus the camera moved down, and by saying theta = -45 degrees it meant that the angle increased too, and the camera moved to the left.
Line 18: I used the Write() animation type to animate the parametric function on the screen.
Line 19: I tilted the camera to a different position again using the self.move_camera() command. Previously phi was equal to 60 degrees and now I decreased it to 30 degrees, which meant that the camera rotated up.
Line 20: I paused the animation on the screen for 2 seconds using the self.wait() command.
Line 22: I grouped all objects on in the scene using the Vgroup() command. I did this so I could remove all of them at once from the screen.
Line 23: I used the Unwrite() animation to remove the group with all the objects on the screen from the scene. I also said that it should happen over a period of 1.5 seconds using the run_time command.
Line 24: I paused the animation on the screen for 1 second.
Let me help you learn Manim
If you want to skip the headache of trying to learn Manim from a bunch of scattered information, I put together a comprehensive 3-hour Manim course for complete beginners.
It will give you all the foundational skills you need to start creating stunning animations with code.
Enroll In Manim Course For Beginners